JavaFXで時間管理タイマーを作る [ボタン編]
ボタンを押したら実際に動作するところまで作ります。
コード
Controller クラス
import javafx.animation.KeyFrame;
import javafx.animation.Timeline;
import javafx.event.ActionEvent;
import javafx.event.EventHandler;
import javafx.fxml.FXML;
import javafx.fxml.Initializable;
import javafx.scene.control.Button;
import javafx.util.Duration;
import javafx.scene.control.Label;

import java.net.URL;
import java.util.ResourceBundle;

import static javafx.animation.Animation.INDEFINITE;

public class Controller implements Initializable {
    private LabT mainTimer = new LabT();
    private LabT allTimer = new LabT();
    private LabT researchTimer = new LabT();
    private LabT restTimer = new LabT();
    private LabT otherTimer = new LabT();

    private Timeline timeline = new Timeline(new KeyFrame(Duration.seconds(1), //時間経過をトリガにするのはTimelineクラスを使う
                new EventHandler<ActionEvent>() {
                    public void handle(ActionEvent actionEvent) { //ここに書いた処理がDuration.seconds(1)で示した感覚で実行される
                        mainTimer.timeCount();
                        allTimer.timeCount();
                        researchTimer.timeCount();
                        restTimer.timeCount();
                        otherTimer.timeCount();

                        mainTimerLabel.setText(mainTimer.formatPrint());
                        allTimerLabel.setText(allTimer.formatPrint());
                        childTimerLabel1.setText(researchTimer.formatPrint());
                        childTimerLabel2.setText(restTimer.formatPrint());
                        childTimerLabel3.setText(otherTimer.formatPrint());
                    }
                }
        )
    );

    @FXML
    private Label mainTimerLabel;
    @FXML
    private Label allTimerLabel;
    @FXML
    public Label childTimerLabel1;
    @FXML
    public Label childTimerLabel2;
    @FXML
    public Label childTimerLabel3;
    @FXML
    public Button mainButton;
    @FXML
    public Label statusLabel;

    public Controller() {

    }

    public void button1Click(ActionEvent actionEvent) {
        researchTimer.active();
        restTimer.inactive();
        otherTimer.inactive();

        mainTimer.reset();
        mainTimerLabel.setText(mainTimer.formatPrint()); //0に戻ったことを表示
        statusLabel.setText("研究中");

    }

    public void button2Click(ActionEvent actionEvent) {
        researchTimer.inactive();
        restTimer.active();
        otherTimer.inactive();

        mainTimer.reset();
        mainTimerLabel.setText(mainTimer.formatPrint());
        statusLabel.setText("休憩中");

    }

    public void button3Click(ActionEvent actionEvent) {
        researchTimer.inactive();
        restTimer.inactive();
        otherTimer.active();

        mainTimer.reset();
        mainTimerLabel.setText(mainTimer.formatPrint());
        statusLabel.setText("その他動作中");

    }

    public void mainButtonClick(ActionEvent actionEvent) {
        if (mainTimer.getStatus()){ //タイマーが動作中のクリック

            researchTimer.inactive(); //タイマーがstop時、全部非アクティブ前提
            restTimer.inactive();
            otherTimer.inactive();
            allTimer.inactive();
            mainTimer.inactive();

            timeline.stop();

            mainButton.setText("らぼいん");
            statusLabel.setText("らぼりだ中");


        }else { //タイマーが動作していない
            mainButton.setText("らぼりだ");

            researchTimer.reset();
            restTimer.reset();
            otherTimer.reset();
            allTimer.reset();
            mainTimer.reset();

            mainTimerLabel.setText(mainTimer.formatPrint()); //0に戻ったことを表示
            allTimerLabel.setText(allTimer.formatPrint());
            childTimerLabel1.setText(researchTimer.formatPrint());
            childTimerLabel2.setText(restTimer.formatPrint());
            childTimerLabel3.setText(otherTimer.formatPrint());

            mainTimer.active();
            allTimer.active();
            button1Click(null); //らぼいん初回は研究中とする

            timeline.setCycleCount(INDEFINITE); //何回繰り返すか指定する
            timeline.play();

        }

    }
    @Override
    public void initialize(URL url, ResourceBundle resourceBundle) {
        mainTimerLabel.setText(mainTimer.formatPrint());
        allTimerLabel.setText(allTimer.formatPrint());
        childTimerLabel1.setText(researchTimer.formatPrint());
        childTimerLabel2.setText(restTimer.formatPrint());
        childTimerLabel3.setText(otherTimer.formatPrint());
        mainButton.setText("らぼいん");
        statusLabel.setText("らぼりだ中");
    }

}
fxml
<?import javafx.geometry.Insets?>
<?import javafx.scene.layout.GridPane?>

<?import javafx.scene.control.Button?>
<?import javafx.scene.control.Label?>
<GridPane fx:controller="Controller"
          xmlns:fx="http://javafx.com/fxml" alignment="center" hgap="10" vgap="10">
    <Label text="らぼいん: " GridPane.rowIndex="0" GridPane.columnIndex="0"/>
    <Label fx:id="inDate" text="dummy" GridPane.rowIndex="0" GridPane.columnIndex="1"/>
    <Label text="らぼりだ: " GridPane.rowIndex="0" GridPane.columnIndex="2"/>
    <Label fx:id="outDate" text="dummy" GridPane.rowIndex="0" GridPane.columnIndex="3"/>
    <Label text="らぼ時間" GridPane.rowIndex="1" GridPane.columnIndex="0"/>
    <Label fx:id="allTimerLabel" GridPane.rowIndex="2" GridPane.columnIndex="1"/>
    <Label text="研究時間: " GridPane.rowIndex="3" GridPane.columnIndex="0"/>
    <Label fx:id="childTimerLabel1" GridPane.rowIndex="3" GridPane.columnIndex="1"/>
    <Label text="休憩時間: " GridPane.rowIndex="4" GridPane.columnIndex="0"/>
    <Label fx:id="childTimerLabel2" GridPane.rowIndex="4" GridPane.columnIndex="1"/>
    <Label text="その他時間: " GridPane.rowIndex="5" GridPane.columnIndex="0"/>
    <Label fx:id="childTimerLabel3" GridPane.rowIndex="5" GridPane.columnIndex="1"/>
    <Label text="状態: " GridPane.rowIndex="6" GridPane.columnIndex="0"/>
    <Label fx:id="statusLabel" text="dummy" GridPane.rowIndex="6" GridPane.columnIndex="1"/>
    <Label fx:id="mainTimerLabel" GridPane.rowIndex="7" GridPane.columnIndex="1"/>
    <Button fx:id="mainButton" GridPane.rowIndex="8" GridPane.columnIndex="0" onAction="#mainButtonClick"/>
    <Button fx:id="childButton1" text="研究" GridPane.rowIndex="8" GridPane.columnIndex="1" onAction="#button1Click"/>
    <Button fx:id="childButton2" text="休憩" GridPane.rowIndex="8" GridPane.columnIndex="2" onAction="#button2Click"/>
    <Button fx:id="childButton3" text="その他" GridPane.rowIndex="8" GridPane.columnIndex="3" onAction="#button3Click"/>


</GridPane>
解説
前回からの変更点
- コンストラクタに処理を書いていたのを対応したボタンとイニシャライザに割り当てた
- ボタンにonActionを追加
ボタンのクリックと関数について
- fxmlで作成したボタンをクリックするとonActionに対応した関数が実行される
- なのでボタンクリック時に実行したい処理を対応した関数内に書いていく
- 引数には何が入るのかは勉強不足により不明
mainButtonClick
- トグル的な動作をさせたいのでif文で動作を切り替えるようにしている
- ボタンと対応させた関数も普通に呼び出すことができる
initializeのoverride
- initializeをオーバーライドすることで起動時に行われる処理を新たに記述することができる
- 使用にはInitializableの継承が必要
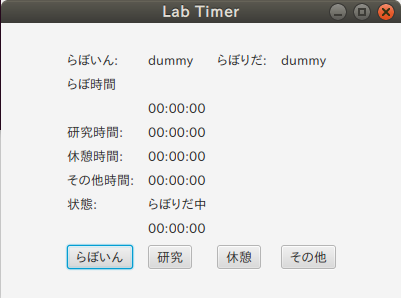
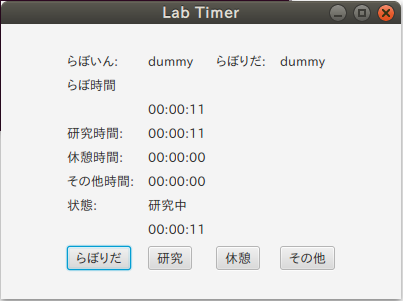
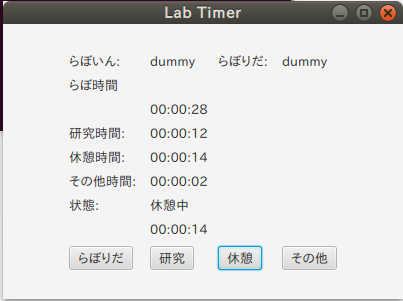
成果画面


次回は日付部分実装したい